One of the most common problems with a home computer, or laptop is RAM problems in my experience. But, RAM problems are not very difficult to fix. It can be as simple as removing the RAM from your desktop or laptop computer’s motherboard, and reinstalling it. I also don’t need to spend much money fixing RAM in my experience because removing RAM from the motherboard does not require any special tools except for a screw driver for opening your computer’s case, and pushing down on the clips which hold the RAM in place once it is installed.
Testing your RAM
A lot of motherboard’s have RAM testing programs which startup every time you turn on your computer when it is off. Sometimes these programs can tell you if your RAM is working or not. But, they are very basic, and are not good for testing your RAM more extensively for a longer amount of time.
If your computer can still start into your operating system like Windows, or Linux, I recommend you test your RAM with a RAM testing program like the bundled RAM Diagnostic tool for Windows or Memtest which is usually found in the GRUB bootloader in Linux operating systems like Ubuntu, and Linux Mint.
Newer Windows operating systems like Vista, 7, 8.1, and 10 has a built-in Memory test program in the Windows Control Panel where you need to search for Memory, and click on the Diagnose your computer’s memory problems link to start the Memory testing tasks. There is also a program called Memtest which you can download the startup ISO from http://www.memtest.org/ , and burn the ISO to a CD or DVD disc to use as a startup disc to test your RAM. Some users recommend that you run Memtest for many hours to a day to test the stability of the RAM. Memtest is also a bundled program which comes with the GRUB bootloader which is the default bootloader for Ubuntu, and other Linux operating systems. It is very simple to run Memtest from GRUB, you usually just need to pick Memtest during startup, and let it run, and if there are not any errors, it usually means your RAM is fine.
Uninstalling and Reinstalling your RAM
Turning your PC off, and unplugging it from the wall’s power is the first step I recommend in troubleshooting a computer which does not start-up or even show the Boot-up animations and logos after the power button is press. Once the computer is turned off, and unplug from the wall’s power, and the battery is removed on laptops, you can safely open the computer case to access the RAM modules which are installed on the motherboard. Before you begin working inside the computer, you should wear an anti-static wrist strap to prevent static electricity from damaging your computer and your RAM while you remove it. Opening up a computer case, usually requires a cross head Phillips screw driver which comes with most computer tool kits which has tools for fixing desktop computers, and laptops.
Removing RAM is not hard, and usually only requires you to un-clip two clips which are attached to the RAM, and gently pulling out the RAM out once the two RAM clips are not attached to the RAM.
Note: If you open your computer, and don’t see a RAM module stick, and RAM Module slots on the motherboard, most likely, your RAM is physically soldered/installed on to the motherboard, and can’t be removed by the user. Soldered RAM requires a computer repair technician to remove the bad RAM, and install new good RAM onto the motherboard. I think soldered RAM is more reliable, so your computer stability problems may more likely be caused by a bad power supply, failing storage drive, software problem, and other part of your computer, and the soldered on RAM is less likely to be causing computer problems.
Once the RAM is remove, I recommend re-installing the RAM by lining up the the RAM with the RAM slot on the motherboard until the two clips closed to see if the RAM was poorly seated which is causing your computer to not startup and have no video signal which can be a sign of a bad RAM installation. Sometimes, your computer will make a loud continuous sound when RAM is not installed properly or broken.
Cleaning the RAM Contacts with Electrical Contact Cleaner
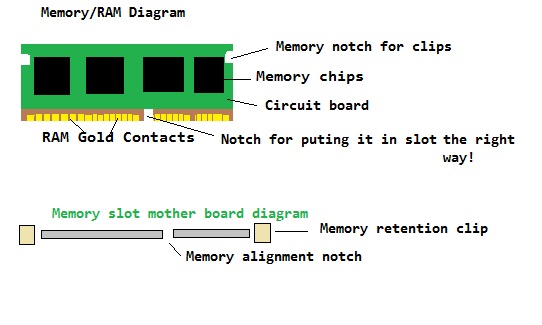
Dirty RAM contacts which are the gold connectors at the bottom of the RAM can also cause your computer to fail to start-up right after you press on the power button.


There are Electronic Contact Cleaners like WD-40 300083 Specialist Electrical Contact Cleaner Spray which works at cleaning sensitive electrical equipment like printed circuit boards, switches, and electrical panels, so it should be safe for cleaning the gold contacts on the bottom of the RAM which is used to connect the RAM to the Motherboard’s RAM slot. Electronic contact cleaner cost $10 or less, and you get a large bottle of it, so one can lasts a long time. In my experience, sometimes the gold contacts get dirty because of oxidation, oil from a person’s hand, dust and dirt which can make the connection unreliable because of dirt blocking the connection. using Electrical Contact cleaner would remove unwanted dirt from the gold contact, and make the connection better which can fix RAM problems like random crashes because of broken RAM. You can also try cleaning the RAM slot on the motherboard by spraying some into the holes on the RAM slot when your computer is unplugged from the wall and there is no power from a battery like a laptop battery, and waiting a few hours for the contact cleaner to dry itself off the RAM, and RAM slot.
Trying your RAM on a different RAM Slot on a Motherboard
Sometimes the RAM module slot on a motherboard can break, and installing the RAM on another empty motherboard RAM slot could fix your computer stability problems.
Replacing your computer’s motherboard would be needed if your computer only has one or two RAM slots, and both RAM slots are broken on your motherboard, or if you want to use two RAM module sticks you own, but only one slot is working, and the other is broken.
Trying Different RAM brands, or Computer which use the same kind of RAM
You can also try different brands of RAM of the same type like SDRAM, DDR SDRAM, DDR2 SDRAM, and DDR3 SDRAM which is compatible with your motherboard to see if the RAM module is broken, or your RAM slot on your motherboard is broken. Trying the RAM on a different computer which using the same type of RAM may help you figure out if the RAM is broken or the motherboard is broken. If the RAM also fails to work on a different computer, your RAM is most likely broken, or the gold contacts need to be cleaned with Electrical contact cleaner to restore the connection to work again.
Checking other computers for problems
Sometimes the problems with your computer may not be caused by your RAM, or motherboard’s RAM slot and maybe caused by a broken power supply, loose power cables, bad video card, failing hard drive or drive cable, overheating problems, and maybe even software problems like a virus infection, or a problem with your PC operating system, or a hardware driver software making your computer less reliable.
Fixing problems with your RAM does not take a lot of time and money in my experience, so it is worth trying to fix your RAM problems by testing your RAM with Memtest, Reinstalling your RAM, trying other RAM slots, and RAM modules, and cleaning the gold contacts on the bottom of your RAM.