I wiped my Cache Partition on my older Asus Google Nexus 7 2012 tablet by starting into its Recovery Mode during Google Android Startup. Wiping the Cache Partition in Google Android is safe, and made my older Asus Nexus 7 2012 tablet faster, and more reliable like the first few days of using my tablet. Wiping the Cache Partition on my Asus Nexus 7 did not require me to use any third-party apps and software. I did not even need to connect it to a PC with a USB cable. I just needed to shutdown my tablet, turn it ON to start my tablet into Recovery Mode by starting my tablet into the bootloader by pressing volume down and the power button at the same time, and look for Wipe Cache Partition in Recovery Mode to start wiping my cache partition.
More Experience users should be able to wipe the cache partition in a few minutes or less, or a few seconds depending on the speed of the device, and how experienced the user is.
I think the Cache Partition is similar to the Swap/Page Partition in Linux which is a virtual RAM partition on a hard drive where the operating system uses the Swap partition to temporarily store cache and temporary files and folders for faster access sort of like a computer’s RAM/Memory.
Wiping the Cache Partition won’t delete your apps, files, games, and custom settings, and it won’t clear your App Cache files stored on the Google Android Operating System Partition or MicroSD Memory Card if you move the App to a MicroSD card. You would need an app like Clean Master, or manually clearing your app cache files in Google Android’s Storage settings section in the Google Android’s Settings App.
After wiping my cache partition, I experience fewer black screens when using apps, and games. My data on my tablet’s internal storage was not deleted after Wiping the Android System Partition like a Full System Recovery Wipe which deletes everything. I also experience fewer error messages that my app or game is not responsive, and if I wanted to wait, or forced closed the app. Wiping the Cache Partition also seem to fix my Random Reboot problems which I used to experienced in Google Android on my older Nexus 7 tablet.
Wiping the Cache Partition can also increase the battery life of your Google Android device. My device seem to use less RAM, and CPU resources after wiping the Cache Partition, so the lower system resource usage would improve the battery life of my device.
Some Google Android devices don’t have the Recovery Mode bootloader turned ON, so you would need to install a custom ROM to enable the boot loader in Android to enter Recovery Mode to wipe the cache partition. Running a Factory Reset may also wipe your cache partition, but also deletes all your apps, games, settings, and personal files.
Before you begin the Wipe Cache Partition process, I recommend you fully charge your smartphone or tablet’s battery, and also backup important files just in case you choose wipe device or perform a factory reset in Recovery mode by mistake instead of wipe cache partition which won’t delete any files and folders like Factory Resetting your Android device which deletes your files, and apps.
How to Wipe the Cache Partition in Google Android’s Recovery Mode for the Asus Nexus 7 2012 Google Android 5.1 Lollipop tablet
- Turn off your tablet if it is currently powered ON.
- Hold down the volume down button while pressing on the Power button to turn ON the tablet.
- You should see an Android robot picture with its door open, and your touchscreen won’t have touch, so you would need to use your physical power, volume up, and volume down button to use your tablet in Recovery mode. The power button is like the Left-Click Confirm Button on a computer mouse for Windows and Linux. The volume up and volume down is use to select different options like wipe cache cache partition, restart, and factory reset by highlighting them in Recovery, and pressing the power button to confirm.
- Press the volume up down button twice to change the Arrow Sign’s text on the Screen to “Recovery Mode”
- Press the Power Button to start your tablet into Recovery Mode, and wait for your tablet to boot into recovery mode.
- When you see an Android robot with a Red ! sign, press the power button, and volume up button for a few seconds until you see the Recovery Text menu. Release your fingers from the power, and volume up buttons.
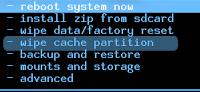
- Press the Volume Down button on your tablet three times to highlight the “Wipe Cache Partition”,and press the power button to begin the cache wipe.
- Wait for Wipe Cache Partition to finish. It should only take a few seconds on the Nexus 7 2012.
- Make sure the Reboot System Now setting is highlighted and press the power button to reboot your tablet.
- You can now use your device normally again in Google Android’s operating system.
Tip: The Asus Nexus 7 2012 and many newer Android devices also has SSD TRIM which will automatically optimize the storage performance of your internal flash memory when your device is turned on and the battery is charged, or almost fully charged, and you have not been using your smartphone or tablet for a few hours. I recommend leaving your device ON while it charges, and not use it for a few hours while it is charging to FULL, so your device can TRIM/Optimize the performance of your internal flash memory chip.
Wiping the Cache Partition on the Nvidia Shield Tegra K1 tablet 16GB version
I also wiped my Nvidia Shield tablets cache by following similar steps to wiping the Nexus 7 Cache user interface. But, I need to only hold the volume down button, and tap and release my finger from the power button when the Shield tablet is turning ON to enter the boot loader on the Shield Tablet instead of holding down the power, and volume down button at the same time. The Nvidia Shield tablet recovery mode does not have as many images like the Android Robot with its door open, and the text is smaller on the Nvidia Shield tablet’s bootloader. I still need to press the power button, and volume up button for a few seconds until I see the Recovery Text menu to enter the options menu with Wipe Cache Partition task on the text menu.
Results of Wiping the Cache Partition on my Asus Nexus 7 2012 and Nvidia Shield Tablet.
Asus Nexus 7 2012
Wiping the cache partition in Android mostly improve older devices like my Nexus 7 2012 which got upgraded a lot of times to newer versions of the Google Android operating system as they got released. My Nexus 7 also gone through a lot of app updates from Google Play app store. I notice after wiping the Cache Partition on my Nexus 7 big games like Asphalt 8 don’t show a black screen or a unresponsive/frozen screens, and my web browser does not crash and freezes a lot like before I wiped the cache partition on my Asus Nexus 7 2012 tablet.
Nvidia Tegra K1 Shield Tablet
Wiping the Cache Partition on the Shield table takes many minutes instead of a few seconds. My Nvidia Shield is newer, and has a faster storage chip, CPU, RAM, and video chip. I did not experience any noticeable performance improvements after wiping the Cache partition on it.
Summary
The simple task of wiping the cache partition on Google Android’s Recovery Mode can make your mobile Google Android device run faster, and more reliably like the day you bought it. The best thing about wiping the cache partition is that it does not delete your apps, personal files, and settings like doing a full factory reset on your device which would delete your apps, and files to factory reset your mobile device.
Warning: I recommend reading your instruction manuals and online tutorials for your Android device Recovery mode to see if there is a recovery mode enabled. Do not press random button combinations like Power and volume up during Android startup. Some devices like the Kobo Vox eReader will do a Factory Reset automatically, which deletes all the data on the tablet, and reinstalls Android, when users press the power button and volume up button at the same time during startup. There is also no easy way to stop the Factory Reset once it has begun. I notice pressing random buttons on some devices during start up can cause the device to freeze, or crash during startup and require me to press down on the power button for a long time to restart the tablet manually. If pressing the power button does not restart your device, you need to wait for your mobile device’s battery to be fully drained to turn it off. You then need to recharge your device, and see if it powers ON. When the screen is not ON because the battery is fully drained, you can remove the battery, and charge your device to see if it will power on.
good tip. supposedly for moto g 3rd gen users, this was a fix that helped with a WiFi battery draining issue after upgrading from the pre-installed lollipop to marshmallow. some people also said that it’s definitely good to wipe the cache partition anytime you ever upgrade Android too
Thanks, I never knew that wiping the cache partition in Android can help with a WiFi battery draining issue after upgrading to Android Marshmallow.
yeah, it may not have been because of wifi tho, it could have been bad system reporting, I found more info on it @ http://www.androidauthority.com/android-marshmallow-problems-troubleshooting-674064/