It is simple, and fast to back up a Raspberry Pi’s SD Card which contains the operating system, programs, personal files, and settings. SD Cards sometimes get broken, and need to be formatted, or replace, so it is important to make an SD card image backup file of your Raspberry Pi’s SD card, so you can easily re-install/image your Raspberry Pi’s Operating system, programs, files, and settings from an SD card image which you made. You also protect your files by having them backup, and restoring your Raspberry Pi’s Operating files, settings, and files from a SD Card .img image file to a SD card is a lot faster than manually re-installing the Raspberry Pi’s OS, programs, files, and settings which can take hours, or days depending on how skilled you are at installing operating systems, and files on the Pi.
The first step is to shutdown your Pi in Raspbian from the menu on the bottom left of the Rasbain OS. Once your Pi has shut down, you would need to unplug your Pi, and remove your Pi’s SD Card from the SD card slot.
Now that you removed the SD card from the Pi, you would need a Windows computer to backup your Pi’s SD card to an Image file.
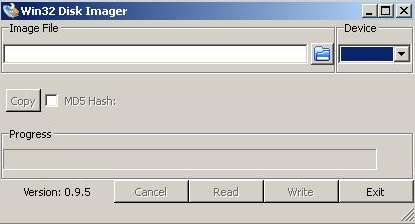
You would also need to download and install a program called Win32 Disk Imager from http://sourceforge.net/projects/win32diskimager/ to Windows.
Win 32 Disk Imager is a program which can be used to make backup files of your SD card, and save them to .img image files which you can use to re-install your backup images of SD cards to a new SD card.
Before you open Win 32 Disk Imager, you should plug in your Raspberry Pi’s SD card into your Windows computer’s SD card reader slot.
When you are done plugging your SD card into your SD memory card reader on your computer, open Wind 32 Disk Imager in Windows.
Click the Folder File icon on Win32 Disk Imager, and type in a file name. Next, click open on the Select a disk image pop-up Window. Lastly, Click on the Read File which will Read your Raspberry’s Pi SD card, and write/save the backup of your SDcard to the image file which you named.
It takes a less than 30 minutes to backup a 8GB Class 10 SD card in my experience.
If you want to make a copy of your SD card with your image file, you need to insert an empty SD card of the same size, or bigger than your SD card image, open your .img backup file you made, and click the write button to write data from your Image file to a new SD card.
You can also share your .img file with other Pi users, and use the same .img file to make additional copies of the Pi’s SD card to use on other Raspberry Pi Model B computers which you own. Using img files to install the Raspberry Pi Operating system, programs, files, and settings is a lot faster than installing them manually with the Pi because a desktop computer is faster than the Pi, and there is no typing, and settings changes which you need to do.